How to install Cellpose for FIJI on OnDemand
Cellpose is a general model for cell and nuclear segmentation. The following is a simple, step-by-step guide to installing Cellpose on OnDemand. More information on how to access OnDemand at the Crick can be found in the wiki.
More detailed information on installing Cellpose can be found here if needed.
⚠️ BEWARE – the FIJI wrapper only works for cellpose version 3.0 (and below). If you have a newer version, you will have to create a new separate cellpose environment for FIJI to access an older version of it (see instructions below).
Step 1: Open Terminal
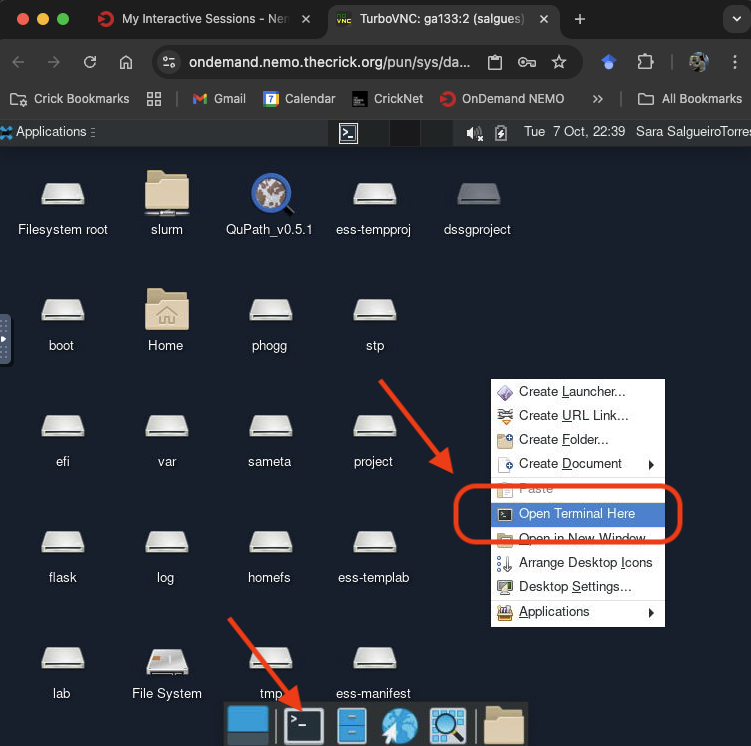
When your GPU OnDemand Desktop session starts, right click and select Open Terminal Here or click on the Terminal icon at the bottom of the desktop:
Step 2: Load Anaconda
You need to set up a conda environment, which will contain your Cellpose installation. To do this, you first need to load Anaconda. Type the following in your terminal window and press Enter:
ml Anaconda3
Step 3: Create Cellpose environment
You then need to create the environment that will contain the Cellpose installation, using the following command:
conda create --name cellpose-fiji python=3.11
In this example, we assigned cellpose-fiji as the environment name (with the flag --name) and we requested version 3.11 for python. The terminal will produce output similar to the following, where user_name will be replaced with whatever your user name is:
Retrieving notices: ...working... done
Collecting package metadata (current_repodata.json): done
Solving environment: done

## Package Plan ##

environment location: /camp/home/user_name/.conda/envs/cellpose-env

Proceed ([y]/n)?
Press y and Enter to proceed when prompted.
Step 4: Activate environment
Activate your new Cellpose environment with the following commands:
conda activate cellpose-fiji
⚠️ NOTE – the first time you use
conda, this command might return an error suggesting you initialiseconda. To do so, runconda initand then try again.
Step 5: Install Cellpose
At this point, it is important to note that you have merely created what is essentially an empty environment called cellpose-fiji. To actually install Cellpose within this environment, run the following series of commands:
pip install cellpose==3.0
The terminal will produce a large amount of output as the necessary packages are installed. Press y and Enter to proceed when prompted.
Step 6: Verify installation
To test whether the installation was successful, run the following:
cellpose --help
If the installation was successful, this should produce a list of all the parameters that can be used when running Cellpose.
Step 7: Deactivate environment
You can now deactivate your Cellpose environment by running the following:
conda deactivate
Run Cellpose from FIJI
It is possible to run Cellpose directly from FIJI. Instructions for installing the necessary FIJI Plugin can be found here. Open FIJI. If you have never installed FIJI on your NEMO, follow these instructions.
Setting up TrackMate Cellpose
The FIJI plugin Trackmate has a detector module that relies on cellpose to segment cells in 2D. It is not included in TrackMate and must be installed separately. We can use the cellpose-fiji environment we just created.
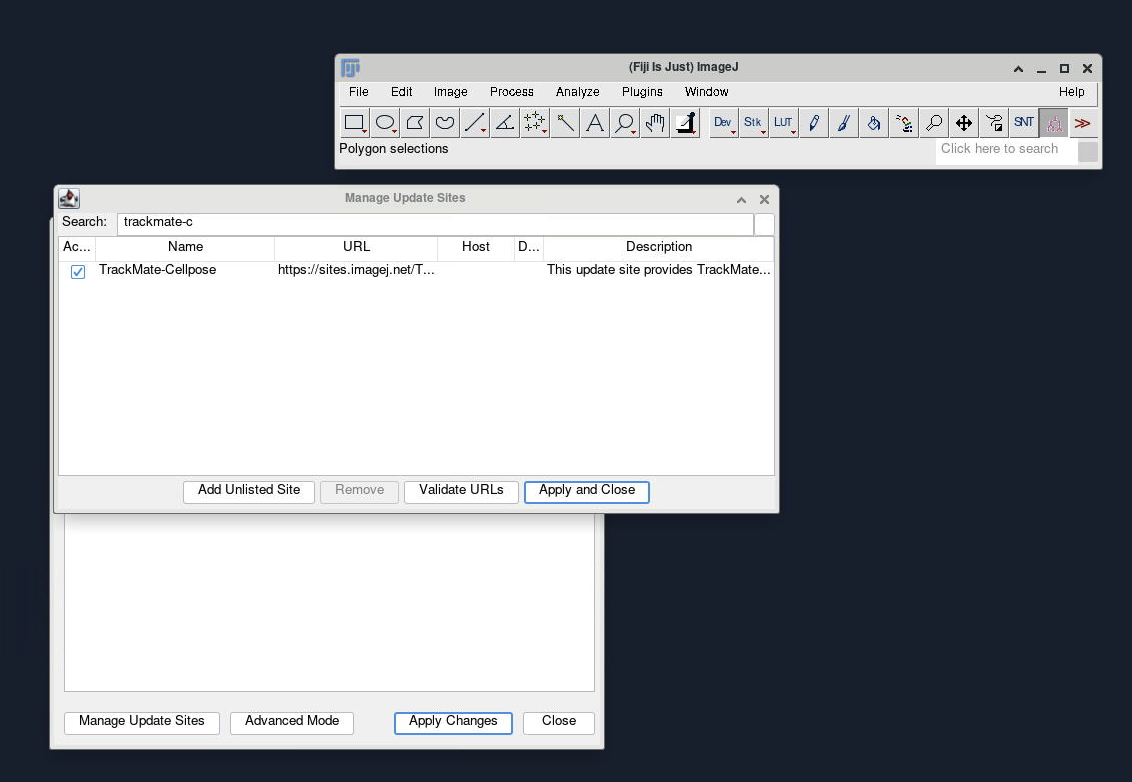
Step 1: Install the Trackmate-Cellpose plugin in FIJI
In FIJI, go to Help > Update…, which will open a window with the plugins that need updating. On the bottom left corner, slick on Manage Update Sites. Now you can look for “TrackMate-Cellpose”. Click on the check box and restart FIJI once it has been installed.
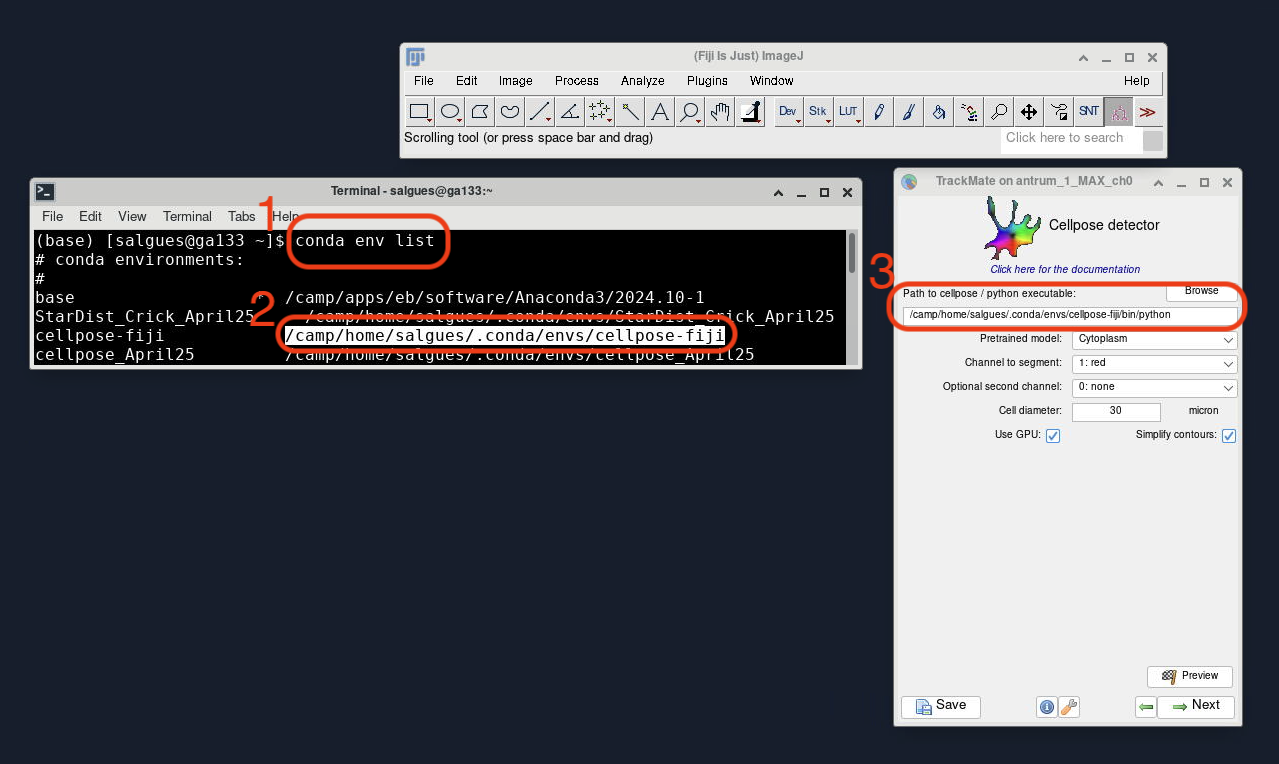
Step 2: Specify where cellpose lives when running TrackMate
Once you have your image open and select Cellpose as your detector model of choice, you will be prompted with a window that asks for the Path to Cellpose/Python executable:
- You can easily find the path of your installation by going back to your Terminal/Anaconda Prompt and typing
conda env list. - This should show you a list of all your available environments,
cellpose-fijishould appear with an associated path. - Copy and paste that into the TrackMate window, followed by
/bin/python. - Select your desired parameters, click Next and use TrackMate as usual.
⚠️ NOTE – the path in the screenshot below will change from user to user.
Run Cellpose as a GUI
To run the cellpose Graphical User Interface, you need to load VirtualGL before activating the conda environment for Cellpose. To load VirtualGL enter the following commands in the command line:
ml VirtualGL
conda activate cellpose-fiji
cellpose
Each step will take a few seconds
Cite!
If you use Cellpose in your work, be sure to cite the relevant paper:
- Version 3 (Latest): Carsen Stringer and Marius Pachitariu. Cellpose3: one-click image restoration for improved cellular segmentation. bioRxiv 2024.02.10.579780
- Version 2: Marius Pachitariu and Carsen Stringer. Cellpose 2.0: how to train your own model. Nature methods, 19(12):1634–1641, 2022.
- Version 1: Carsen Stringer, Tim Wang, Michalis Michaelos, and Marius Pachitariu. Cellpose: a generalist algorithm for cellular segmentation. Nature methods, 18(1):100–106, 2021.